You can usually fix a small tear in a sofa or armchair with fabric glue if the damage is a clean rip with no missing fabric and it sits away from seams and areas that take a lot of strain. Clean the area first, slide a backing patch behind the tear, use a thin layer of glue, press the edges together, and give the repair time to cure before anyone sits on it. Glue is not a good choice for upholstery that is torn under tension, for holes where fabric is gone, or for leather and vinyl. In those cases, stitching, a different adhesive, or an upholsterer will give a better result. The tips below cover how to judge the tear, how to make the repair, and how to look after it afterwards.
Before you start: is glue the right fix?
1. Check the size and type of damage
Fabric glue suits small to medium upholstery damage, such as loose seams, lifted trims, cushion tears and frayed edges. One repair guide calls glue a quick solution for tears less than an inch long. A longer rip can still be glued if the edges meet cleanly. A tear that keeps opening every time you sit down needs more support than glue alone can give.
- Use a backing patch slightly larger than the tear, with a thin layer of glue.
- Too much glue can soak through, darken the fabric and dry stiff.
- Avoid glue on high-stress seams, missing-fabric holes, leather or vinyl, and valuable pieces.
2. Look at where the tear sits
Position matters as much as size. A tear on the side of an arm or the outer back panel takes very little strain. A tear in the middle of a seat cushion, or on the front edge where people slide in and out, gets pulled and rubbed every day. Glue holds up much better in the first kind of spot. On high-wear areas, sewing or a professional repair usually lasts longer.
3. Identify the material
Woven cotton, linen blends and many polyester upholstery fabrics take fabric glue well. Leather, faux leather and vinyl need an adhesive made for those surfaces. Iron-on repair tape can damage them, so check the product label before you use any heat. Velvet and other pile fabrics will show dried glue if it touches the pile, so put the glue only on the backing patch and keep it away from the face of the fabric.
Making the repair
4. Clean the area thoroughly
The fabric around the tear should be clean and free of dust or dirt before you start. Vacuum the area, then spot-clean any grease from hands or food using a method that suits your upholstery cleaning code. Let it dry completely. Glue grips clean, dry fibres. Dust, body oil and fabric protectors all weaken the bond.
5. Use a backing patch rather than gluing the edges together
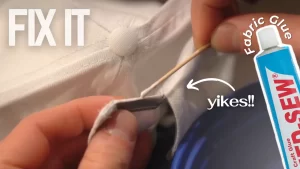
If you only glue the two torn edges to each other, the strip of fabric you are bonding is very narrow and it fails easily. A patch behind the tear gives the glue much more surface to hold. The method is to cut the patch slightly larger than the damaged area, place it behind the tear, apply a thin glue layer, press flat, and cure for 24 hours. Pick a thin, tightly woven fabric for the patch, such as plain cotton, so it does not create a visible lump. Round the corners so they are less likely to lift.
To get the patch in place, fold it lengthways or roll it up and push it through the tear with tweezers or the blunt end of a chopstick. Then flatten it out underneath the opening. A strip of cardboard or wax paper slid in behind the patch stops glue from reaching the foam or batting.
6. Apply less glue than you think you need
Too much glue can soak through fabric, leave a dark mark, dry stiff, or squeeze out around the repair. Spread a thin, even layer on the patch with a toothpick or a small spatula, working just under the torn edges. Wipe away any squeeze-out straight away with a damp cloth. Dried glue on the surface is much harder to remove.
7. Press the edges together and hold
Bring the torn edges together over the patch so they meet without overlapping. Press firmly for 30 to 60 seconds. Line up the weave or pattern as you press, because that does more to hide the repair than anything else. Lay wax paper over the area and rest a book on top while it sets.
8. Let it cure before anyone uses the seat
Fabric glue can feel dry to the touch long before it has reached full strength. Leave the piece unused for at least the cure time printed on your product label. A full day is a sensible minimum. Ask everyone in the house to stay off it, and keep pets away too. Sitting on a half-cured repair is one of the most common reasons these repairs fail.
When not to use fabric glue on upholstery
Glue is convenient, but sewing or a professional repair is often the better choice. Avoid glue in these cases:
- High-stress seams and load-bearing areas. Seat seams, corners and anywhere the fabric is stretched tight over the frame need stitching.
- Holes where fabric is missing. These need a patch or a new panel. Glue cannot pull the edges together.
- Valuable or antique pieces. If the repair has to be invisible, or the piece is worth a lot, ask an upholsterer.
- Heavy-use seats. Furniture used for rough play by children or pets will strain a glued repair hard.
- Junctions where several seams meet, or edges at piping and zip openings.
- Surfaces with old glue, oil, or a waterproof coating. The same guide notes that these surfaces in particular need a backing patch.
Quick fabric guide
| Fabric/material | Best method | Key warning |
|---|---|---|
| Denim/cotton | Glue or sewing | Cure fully before washing or use |
| Stretch fabric | Flexible glue | Tape may feel stiff |
| Leather/vinyl | Specific adhesive | Iron-on tape can damage the surface |
| Delicate synthetics | Test first | Heat from an iron can melt or mark |
| High-stress seams | Sewing | Glue may not be sufficient |
Care checklist after the repair
- Apply a thin, even layer. Glue that is too thick will not cure properly.
- Press firmly for 30 to 60 seconds.
- Remove any excess before it dries.
- Let the glue cure for 24 to 72 hours before washing a removable cover or using the seat heavily.
- Wash removable covers inside-out on a gentle cycle, if the care label allows washing.
- Avoid high heat in the dryer, and check the care label first.
- If you are unsure, test the glue on a hidden seam allowance or a scrap of fabric first.
Check the product label for safety guidance, especially if children are helping. Open a window while you work. A “non-toxic” claim on a label is the manufacturer’s own declaration. It is not an approval from Health Canada.
If the repair lifts after a few weeks of use, take that as a sign the tear sits in a high-strain spot. At that point, stitching or an upholsterer is the next step, rather than adding another layer of glue.
This article is for general information only and does not constitute legal, technical, or professional advice. Always consult a qualified professional for guidance specific to your situation.
How big a tear can fabric glue fix on a sofa?
One guide calls glue a quick solution for tears under an inch long. Longer clean tears can still work with a backing patch, but they need to be away from areas that take a lot of strain. If fabric is missing, glue alone will not close the hole.
Can I use fabric glue on a leather or vinyl sofa?
Use an adhesive made for leather or vinyl instead. Iron-on repair tape can damage these surfaces.
How long should I wait before sitting on the repaired spot?
Wait at least the cure time on the product label. A full day is a sensible minimum. Glue can feel dry well before it reaches full strength.
- How to Use Fabric Glue for Upholstery (GleamGlee) — Suitable damage types, the backing patch method, and the risks of using too much glue
- How To Repair A Tear In Couch Fabric (North Shore Crafts) — Glue as a quick fix for tears under an inch
Last updated: 2 November 2026