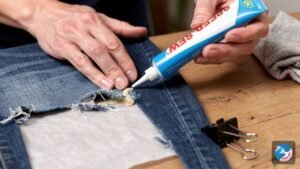
To glue a patch onto a canvas tote or backpack, start with a clean, dry surface. Spread a thin, even layer of flexible fabric glue across the back of the patch, keeping it slightly in from the edges. Press the patch firmly in place, then leave it flat and undisturbed until the glue has fully cured. Canvas is one of the easier surfaces for a glued patch because it is a sturdy, flat woven fabric. Placement still matters, though. A patch on the front panel of a tote will hold up very differently from one on a strap or a backpack corner that rubs against things all day. The tips below cover how to get a good bond and how to choose the right spot. They also explain when needle and thread is the better choice.
Before you start: is glue the right method?
Glue is quick and needs no sewing skills, but it is not always the most durable option. Several patch guides recommend sewing when you want a patch to last as long as possible, especially on backpacks. One backpack patch guide describes stitching as often preferable to glue or iron-on methods for long-lasting results. A reasonable middle ground is to glue the patch now and add a few hand stitches around the edge later if it starts to lift.
- Use thin, even glue and press firmly, then cure 24 to 72 hours before washing.
- Put cardboard inside the bag so glue does not bond the front and back together.
- Sew patches on straps, seams, nylon and heavily used bags.
Quick tips for gluing a patch on canvas
1. Check what your bag is really made of
Many bags that look like canvas are actually nylon or polyester, especially backpacks. Check the care label before you begin. Foley + Corinna’s backpack patch guide suggests sewing patches onto nylon and leather, and saving iron-on methods for canvas and denim. It also mentions flexible glue or hook-and-loop as options in some situations. If your bag is synthetic, test the glue on a hidden spot first.
2. Wash or wipe the area and let it dry completely
Dust, grime and fabric finishes can stop glue from gripping the fibres. Brush off loose dirt, spot-clean the area if it is grubby, and make sure it is completely dry before you apply any glue. Damp canvas weakens the bond.
3. Plan the placement before you open the glue
Lay the patch on the bag and mark its outline lightly with chalk or a fabric pencil. Flat, low-movement areas work best, such as the front panel of a tote or the main face of a backpack. Avoid spots that bend constantly or take a lot of abrasion.
4. Put something inside the bag
Slide a piece of cardboard or a cutting mat inside the tote or backpack under the patch area. This gives you a firm surface to press against. It also stops glue that seeps through the canvas from sticking the front and back of the bag together.
5. Apply a thin, even layer to the patch back
Spread the glue across the back of the patch, staying just inside the edges so it does not squeeze out. A thick layer can take much longer to cure and may never set properly in the middle. Concentrate on even coverage, paying attention to the corners, because that is usually where a patch starts to lift.
6. Position it once and press firmly
Line the patch up with your chalk marks and set it down carefully. Avoid sliding it around, which smears glue onto the visible canvas. The same backpack guide stresses placing the patch precisely on the glued area. Press firmly with your palm for 30 to 60 seconds, working from the centre out to the edges.
7. Wipe away excess right away
If glue oozes past the edge, remove it with a damp cloth or cotton swab before it dries. Dried glue on canvas can leave a shiny, stiff mark that is difficult to remove.
8. Weigh it down and let it cure fully
Put a few heavy books on top of the patch, with a sheet of parchment paper between them, and leave the bag flat. Glue that feels dry to the touch has not necessarily reached full strength. Give it 24 to 72 hours before carrying anything heavy or washing the bag, and follow the timing on your glue’s label.
9. Consider iron-on or stitches as backup for heavy use
If your patch has a heat-activated backing, canvas is a good match for it. Patch Makers USA says canvas bags and totes work well with iron-on patches. Do not use heat on synthetic fabrics, though. Nylon can melt. For a bag you use every day, adding a few hand stitches at the corners is a simple way to make any patch more secure.
When not to use fabric glue
Glue works well on flat, low-stress surfaces. It is the wrong choice in these situations:
- Backpack straps and load-bearing areas. These carry weight and flex constantly, so sew patches here instead.
- Seam junctions, pocket openings and edges. Uneven, bulky areas give glue a poor surface to grip.
- Large holes where fabric is missing. A patch glued over a big gap has little to hold on to. Repair the hole properly first.
- Expensive or sentimental bags. Glue is hard to undo, so a sewn patch is safer if you might want to remove it later.
- Kids’ bags that get rough use. These are dragged, thrown and stuffed full. Stitching will hold up better.
Some patch makers also describe glue as less durable than heat bonding and not recommended for high-wear areas. The Patch Makers USA guide makes this point.
Material quick reference
| Fabric/material | Best method | Key warning |
|---|---|---|
| Canvas/cotton | Glue, iron-on or sewing | Cure fully before washing |
| Denim/cotton | Glue or sewing | Cure fully before washing |
| Stretch fabric | Flexible glue | Tape may feel stiff |
| Leather/vinyl | Specific adhesive | Iron-on tape can damage surface |
| Delicate synthetics or nylon | Test first, or sew | Heat from iron can melt or mark |
| High-stress areas (straps, seams) | Sewing | Glue may not be sufficient |
Care checklist after gluing
- Apply a thin, even layer, because too thick prevents a proper cure.
- Press firmly for 30 to 60 seconds.
- Remove any excess before it dries.
- Cure 24 to 72 hours before washing.
- Wash inside-out on a gentle cycle if the bag is machine washable.
- Avoid high heat in the dryer, and check the bag’s care label.
- Test on a scrap or hidden spot first if you are unsure.
Check the product label for safety guidance, especially if children are helping with the craft. In Canada, consumer products fall under the Canada Consumer Product Safety Act. A “non-toxic” claim on a glue label is the manufacturer’s own declaration, not a Health Canada approval.
If you would like a refresher on spreading glue neatly, practise on a fabric scrap before you start on the bag. That way, you will know how much glue the patch needs and how it behaves once pressed.
This article is for general information only and does not constitute legal, technical, or professional advice. Always consult a qualified professional for guidance specific to your situation.
Can I glue a patch onto a nylon backpack?
Test the glue on a hidden spot first. Patch guides generally recommend sewing patches onto nylon, and you should never use an iron on it, because nylon can melt.
How long should I wait before washing the bag?
Let the glue cure for 24 to 72 hours, and follow your glue’s label. Then wash the bag inside-out on a gentle cycle if its care label allows machine washing.
Should I glue a patch onto a backpack strap?
No. Straps are load-bearing and flex constantly, so sewing is the better method there.
- How to Stick Patches on Backpacks: Easy Guide for All Types — Sewing is often preferable for durability; place the patch precisely on the glued area; nylon can melt with iron-on heat.
Last updated: 1 November 2026